Wednesday, December 17, 2014
LOOK WHAT I GOT FOR MY QUILTING CUSTOMERS!
Monday, September 22, 2014
"HOW LONG DID IT TAKE YOU TO MAKE THAT QUILT?" BY REBECCA LATHAM
It seems that every time I show a finished quilt to someone, they always ask the same question:" How long did it take you to make that quilt?" My answer is always the same:
In the photo above, the vertical seams have been sewn. Each seam, including removing from the design wall, arranging, sewing, pressing and putting back on the design wall, took twenty minutes. For eleven seams - three hours and forty-five minutes.
Sewing the horizontal seams took sixteen minutes for each seam, so that came to four hours of work. Now it was time to audition border, binding and backing fabric, so I was off to Robert's Sewing Center.
The digital quilting design is "Keukenhof" and I purchased it from Urban Elementz. The thread is "Vineyard", a variegated purple, pink, and teal 100% cotton thread by YLI Threads.
Laying out the top, back and batting on the floor to check for size and to place a few safety pins as registration points took fifteen minutes. Loading the quilt components onto the frame and doing the actual quilting took five hours. Trimming the quilt and squaring it up took another fifteen minutes. Cutting, seaming and attaching the French fold binding took two hours. Designing, making and attaching the label took another one hour. And the quilt is finished! Here are the final photos:
Sunday, September 7, 2014
RAINBOW STARS AND ZIG ZAGS BY REBECCA LATHAM
FROM CONCEPT
TO COMPLETION
Twelve years ago, back in 2002, I went to a quilt show and bought some fabric. Now, I've bought a lot of fabric, but I usually know what I'm going to make with it and when I'm going to make it. This was the first time I just fell in love with some fabric and bought it on a whim. I guess I've learned my lesson, because I've never done it again! Anyway, here is what I bought way back around the turn of the century:
This picture shows four identical bundles of twelve Fossil Fern fabrics in rainbow colors, arranged so that you can see all the colors. I only bought one bundle.
I found this Laurel Burch fabric, which is called, "Cats in Jungle". I thought it would work well with the rainbow fabrics, and I was not sure how much to buy, so I bought four yards.
I always planned to make a kid's quilt out of this collection, and, last week, I pulled the fabric out and started browsing through Pinterest to get ideas. I saw the quilt below, designed by Gerri Robinson, and liked the idea of having rows of different blocks that looked good together, rather than just one block throughout.
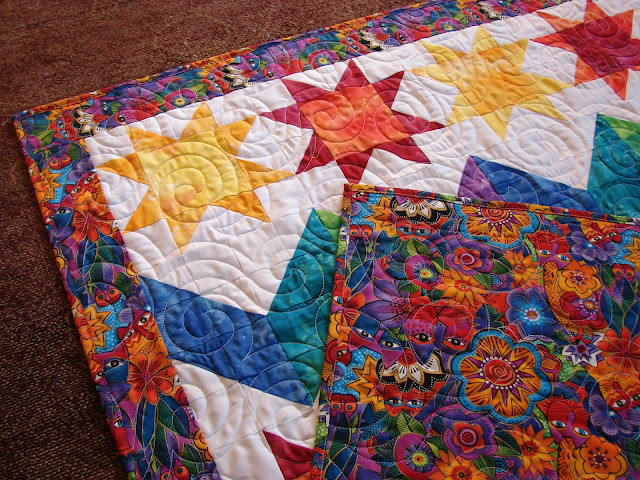
I think this quilt is rectangular, but I wanted a square quilt. I made a couple of other changes as well, like using different colors for the centers and points of the stars, and using more colors for the stars and chevrons. Where Gerri chose not to have a border on her quilt, I used the Cats in Jungle fabric to make a 3.75" border. I used the same fabric for the binding and the backing, Warm and White 100% cotton batting, and white King Tut 100% Egyptian cotton quilting thread.
Most of the time, I seem to gravitate to scrappy quilts, ones where I tend to make one block at a time. This time, I was able to do a lot of chain piecing, because many of the blocks were identical. That was fun for a change!
With the piecing done, I started to choose a quilting design from the ones I already own, but the idea I had was for something swirly or loopy, and nothing I had quite fit the bill. I went to Urban Elementz and popped for a new design called "Outside In". It turned out perfect! It was so fun to quilt, especially watching the pattern develop over all the brilliant colors. Here are a few photos of the quilt on the frame of my Tin Lizzie Ansley 26 long arm quilting machine:
Now that the binding is done, the quilt is ready to be posted to my Etsy shop. I had so much fun designing and creating this quilt. I would love to
keep it for myself, but the quilts around here are starting to pile up,
as you can imagine. The joy was in the journey for me, but this
fantastic kid quilt's journey will not be over until it finds a loving
home! Thanks for visiting today, and I'll leave you with a few photos
of the quilt.
Tuesday, July 29, 2014
SCRAPPY APPLES BY REBECCA LATHAM
I just finished a project! From start to finish, I guess it was a
little less than a week in the making. I'm calling it "Scrappy Apples"
because it is made from my stash of scraps left over from other quilts,
and the quilting design is apples and leaves.
I made this Sixteen Patch quilt for a dear friend that I have never met. That's right - we met on the internet and became friends in real life. We live in different parts of the country, so we have never met in person, but we speak on the phone and text often.
My friend's name is Karen, and the quilt is on its way to her, and she has no idea it is coming. I can't wait to hear from her when it arrives!
When I first started designing the quilt with my quilt software, I envisioned the blocks set side by side. But after I made several of them, I reconsidered and changed the setting to "on point" with setting squares in between.
I always appreciate the opportunity to use the new design wall that Bill and I made a few months ago. It is insulation board with cotton batting glued to it. The blocks just stick to it naturally and you can rearrange to your heart's content. Here is where I kept playing with the color placement until I was happy with it.
The photo above shows how the quilt top, quilt backing and quilt batting are loaded on the long arm machine. I took this picture after I had only been quilting for about an hour. I worked on this all day, and it took over eight hours to finish!
Originally, I planned on using a printed fabric for the quilt backing, but decided to use white. First of all, I had a lot of this fabric on hand that I had purchased at Hancock's of Paducah a few years ago. It is 100% cotton, of course, and it is a soft as butter! So I knew that it would make a soft and comfortable backing. Secondly, and maybe more importantly, I wanted a back that would show off the quilting. Mission accomplished! A printed backing would have looked pretty, but the quilting would not have shown up as much.
I really need to use up some more of my scraps!
PUMPKIN SPICE STARS
I just finished this colorful wall hanging, which will celebrate Pumpkin Spice Season over my mantelpiece for the next three months.

-
Emily at age 17 in 1996 Rebecca at age 23 in 1981 Friday, June 27, 1997 - I spent most of the day that day with my 18...
-
This queen size quilt was brought in by my customer, Becky. It was a "Block of the Month", so it took a while to get it finished...
-
I just got a new digital quilting design from Urban Elementz! This design, called "Ripples" is perfect when you are looking ...